During a recent event I found some interesting features of the Zoom Screen Share using the advanced Video Player. After finding these golden nuggets, I found some other features I’d like event more! Here’s the details on what I found, and information about my recent Feature Request to Zoom.
Note:
My goal is to update this with a few small screen shots, and even to create a video version of this post on YouTube.
Using Share Screen Video Player
There were 30+ webinars over a 5-day period for a global media company. Webinars were used to host the panelists and a few support staff, and the event was live streamed to Workplace. Webinars with Backstage were used, with all panelists On-Stage during the event, and support staff remained Backstage, using Meeting Chat to communicate with their respective panelists as needed.
The Use Case
The specific use case at this event was that each webinar had a “pre-roll” of an opening slide plus music chosen specifically for each topic, and also a “post-roll” of a closing video of a Thank You image sporting a QR code for viewer comments, also with event-specific music.
During the planning week, we first experimented using Share Screen to push out a PowerPoint slide with embedded music, but any time the Host machine took the window focus away from PowerPoint — the music stopped! We tried a few other options, including showing the PowerPoint slide and playing the music separately, but that seemed to unnecessarily complicate things for the 4 Zoom Technical Directors (TD) charged with hosting the Webinars, with 3 Windows users and 1 Mac user.
Ultimately we decided on the approach of rendering an MP4 for pre-roll and post-roll with the single slide showing and the music playing. Two members of the team (one TD and the project lead) took time each night to render the pre- and post-roll videos, dropped them into session-specific folders on DropBox, and at the start of day the next morning, we all had out pre- and post-roll videos ready to go.
How It Works Now
If you’ve never done this before, I’ll give you a quick run-through of how it’s done. Note that I always run through these steps in the first few minutes after opening the webinar to ensure that the proper folders are selected when the show is going live.
- First, click the green Share Screen button, as always.
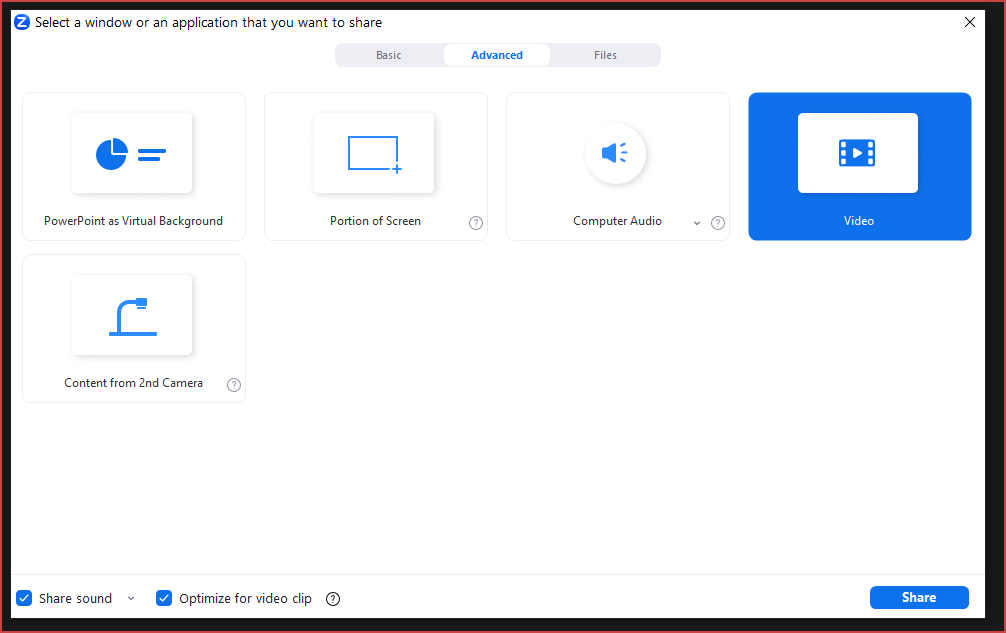
- Next, once the Select a window or an application that you want to share window comes up, click the Advanced tab at the top.
- Then, click the Video box, typically on the right side of the top row of icons. Note that when you do this, the Share sound and Optimize for video clip checkboxes will be checked. (Do not uncheck them unless you know the consequences.)
- Click the blue Share button in the bottom right of the Select a window or an application that you want to share window.
- An old-school-style Open dialog window will appear.
- NOTE: You are not yet sharing your screen, and the attendees and any live stream will have no idea that you are preparing to share your screen. However, as soon as you press the Open button (assuming you have selected a video Zoom can play), the appearance for viewers will change to the You are viewing <name of sharer>’s screen view, and your screen will change to show the Video Player and the floating green/red You are screen sharing menu bar. The title of the Video Player window will have the name of your selected video in it.
- Once you click the Open button on the Open dialog window, your player will show but it will not play automatically. Note that if your video has a “fade in” effect, the screen will likely be blank/dark for everyone. Carefully consider having something show on the first (and last!) frames of your video.
- One more note, if you are also live streaming: You will want to allow some time to set up your stream. In our case, we clicked the Live on Workplace by Facebook on the floating menu’s More icon and went through the steps up to actually starting the live stream. Knowing the length of the pre-roll and the planned start time for viewers, I simply backed off the pre-roll time, added 15 seconds (to allow for the stream delay) then clicked Start Stream, waited a few seconds to see that the video connected, then proceeded with hitting Play on the video player. Don’t go through the stream setup too early, as most streaming services will time out and go back to the beginning of the setup process if you haven’t initiated the stream in time — usually 3-4 minutes.
- When you are ready for the video to play (in my case, for the music to start, since the image shown was a static intro slide), click the Video Player’s Play icon. You’ll have to hover over the player, to see it, and if you stay stationary long enough (about 3 seconds), the player controls will fade (quickly) — until you move the mouse again.
- After you click the Play icon it changes to the Pause icon.
- When the player controls are visible, you also see the current playhead time and the total time of the video, along with a progress bar with a movable white dot for the playhead. At the right end of the player controls is a volume icon and a full-screen icon. (More on these later.)
- Assuming that you clicked Play, and you care about alerting your talent to prepare to start their video, you’ll have to do mental math to subtract the current playhead time from the total time, to know how much time is remaining. I like to Chat the remaining time increments, especially at 2 minutes, 1 minute, and 30 seconds.
- Make sure your Participant window is visible, and your first talent to be on screen is easily found. (Having ZoomOSC, a Stream Deck, and the Zoom/Stream Deck integration in Companion is a big help, but I’ll assume most of you won’t have these tools available.)
- When there’s 5-8 seconds left, I click the Ask to start video menu for the first onscreen talent, and as their camera video appears, I click the Close icon (X in the upper right corner of the Video Player) to stop the Share Screen.
I know it might sound complicated if you’ve never done it before, but trust me — after doing it under Go Live pressure a few times, it’ll become second nature to you, especially if you have practiced it 100 times before the first Go Live.
My Feature Request
All of that process above works reasonably well, especially after doing it a few dozen times. But there are some things that I feel would make the overall process much easier. Just these two things would make the TD’s life a lot easier in these situations.
Persistent Control Views
It was often a pain to have to push the mouse over the Video Player just to see the controls. Whether looking for the current play time and the total time (doing the math in my head was the hardest part), or attempting to adjust the player’s volume, I wished I could just go in and do it, without first having to “wake up” the controls on screen.
Display “Time to Go”
Rather than relying on the math in my head, I’d really like the player controls to include a “Time to Go” computation: how much time is there from the current play head to the end of the video?
But Wait… There’s More!
I discovered — quite by accident — that there are keyboard shortcuts available in the Video Player! Here’s what I found… and there may be more:
- Start/Pause with the Space Bar. This is huge! As long as Zoom has the focus, when it’s time to start the video, press the space bar! No twirling around trying to wake up the player controls, no frantic squiggling back and forth to the the cursor perfectly over the Play icon… just hit the Space Bar!
- Volume Up/Down with the Up/Down Arrows. Unfortunately the process used to make our pre- and post-roll made the music WAY loud, and we needed to drop the player volume 2-3 notches before playing. Doing this manually with the mouse/cursor was a pain!! Once I discovered the keyboard shortcut for this, it was easier. The problem was that since the player controls disappeared in 3 seconds, you could continue to move the volume without seeing its current position… to the point that it would go mute at the bottom click.
- Move Playhead Left/Right with Left/Right Arrows. Whether you’re playing or just waiting, you can move the playhead left or right in 10 second increments. I wish there was a way (maybe with the Shift key) that you could move in 1-second increments. And you have to be careful not to accidentally hit left/right while playing, since the video will jump immediately as commanded!
The sad part to me is that these things don’t appear to be documented anywhere on the Zoom Support site. But now you know!
Practice! Practice! Practice!
I can’t stress enough how important it is to practice these things! I’m lucky in that I have my main PC, a stand-by PC (in case the main PC fails), a small BeeLink PC, and a Mac Mini, and can easily conjure up a few attendees through the magic of a 4-way HDMI/keyboard switch.